Are you tired in writing complex code for your database design? Want to be little relax? This article will help you to enjoy your job.
In early days we had to write coding from the scratch to implement our database designs. Later people moved to database designing graphical tools. The latest trend of designing databases is use database navigation maps where you can visually feel your database design. This method is very useful if your database is little complex and you have lot of key constraints, referential integrity constraints, indexes and triggers etc. Using database navigation maps you can see either the entire database or part of it, how the tables are integrate each other, what are the keys you have defined for tables and references etc. Most importantly you don't need to write any single code or no need to remember complex SQL syntax.
Database Navigator Maps in IBM iSeries Navigator is providing very easy and flexible way of designing you database. Sometimes you might use this tool as visual tool but here I am explaining how you can use this tool as development tool to implement your database physically. Login to iSeries Navigator and browse databases section. If you are not familiar with the iSeries Navigator read this article. Under database section you can see Database Navigation Maps in tree view.
 Fig 1: Select Database Navigator Maps
Once you select database navigation maps you will see existing maps in right hand side pane. Double clicking on the map you can open it and see. But let see how you can design new database using this tool. Right click on Database Navigation Maps and browse New -> Map.
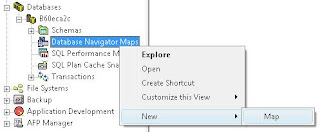 Fig 2: Create New Database Navigation Map
This will open Database Navigator window which allow you to design your entire database. There it will list all the existing schemas and you can design your database under any schema listed there.
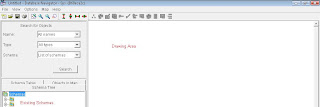 Fig 3: Database Navigator Window
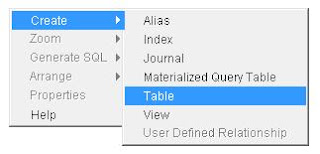
Drawing area is the place you can use to draw or design your database. Right click on the drawing area and brows Create and select which you want to create. You have options to create database table, view, index, journal, alias, materialized query table and user defined relationship. By default user defined relationship is disabled and later will discuss how to write user defined relationship with the navigator.
Once you create new element it is again open same window as iSeries Navigator opens to create new elements. I have already discussed to work them and design your database. You read more details from this article.
Once you designed you database using this tool it will look like this.
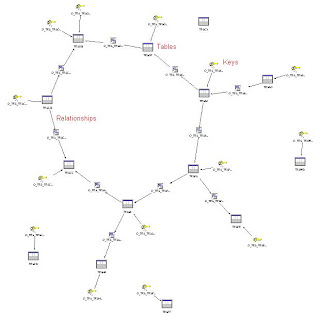
Fig 5: Sample Database Navigator Map
Final step is save the successfully design database into you DB2 database management system. Select save option from the file menu then give a name for your map select schema in which you need to save the database.
Later if you want you can change this design any time and save it. Please note that if you save the Database Navigator Map that mean your are physically change your database.
While your friend is spending days to develop a database, you can simple develop your database withing few minutes and have a relax. So try and see how you can simplify your work and have a fun.
If you have any questions you can post them under comments. I will reply them.
how we download this component?
ReplyDeleteYou don't need to download as separate application. It comes with your iSeries Navigator Client installation from IBM package. Please refer below link if you need to know how to open this application
ReplyDeletehttp://lk-tech.blogspot.com/2009/05/ibm-iseries-navigator.html