We can make native portable mobile applications utilizing JavaScript and React. It utilizes React to make a rich versatile UI interface.
Presently, the inquiry strikes a chord, who's utilizing React Native? According to the official site, a huge number of applications are utilizing React Native from set up fortune 500 to up and coming new businesses. A portion of the well known applications that are utilizing React Native incorporate Facebook, Instagram, Bloomberg, Pinterest, Uber, Skype and so on
Prior to beginning, it's suggested that you have the essential information on JavaScript and React so you can comprehend the React Native applications.
Setting up the Environment
To begin, we need the underneath application introduced in the framework.
Java SE Advancement Pack (JDK)
Android SDK, Android Virtual Gadgets
Visual Studio Code
Introducing and setting up the environment for React Native applications is simple. You need to download the bundles from the particular website and snap on Straightaway and Next catches. Be certain that you have introduced all the referenced applications required for the React application.
You can discover more subtleties of the way toward setting up the environment on the React Native official site. Presently, open the command prompt, and run the beneath command.
npm i -g create-react-native-app
It will download the bundles needed to make a React Native application. Type make react-native-application <HelloWorld> and hit Enter.
create-react-native-app HelloWorld
During the establishment, the npm will request one extra bundle, i.e., Expo which loads and runs the CRNA venture written in unadulterated JavaScript without incorporating any native code. It is free and open source toolchain worked around React Native to assist you with building iOS and Android ventures utilizing JavaScript and React. In the event that, npm requests the establishment of Expo, select "Y", i.e., Yes. At that point, it will request to pick a format. Select the Clear layout, as we are attempting to keep it as basic as could reasonably be expected.
? Choose a template:
blank
minimum dependencies to run and an empty root component
tabs
several example screens and tabs using react-navigation
It will take a couple of moments to extricate the undertaking documents and introduce the conditions.
When the task is made effectively, change the catalog to the application name gave by you during application creation (for my situation, it is Hello World).
cd HelloWorld
Run the npm start command to begin the application.
npm start
It will begin the Expo and show a QR code which can be examined utilizing Expo in Android gadgets to begin a metro bundler as a worker on the localhost.
You can straightforwardly run the application on an actual gadget with the Exhibition Application. Open Play Store on your Android Gadget.
Subsequent to introducing the Exhibition application, you have to filter the QR Code.
Or then again, you can run it on the Android Virtual Machines. Open the AVD Supervisor in your framework, make an Android Machine by tapping on the "Create" button. It will request a couple of subtleties to give the Gadget Name, select Picture, Memory Size, and different alternatives in the virtual machine.
Whenever everything is done, click on "Start". It will require some investment to begin the Virtual Machine.
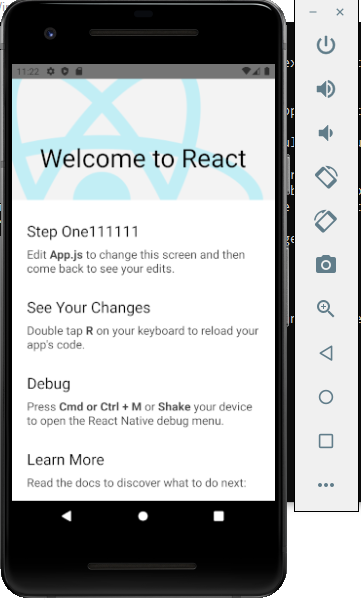
After the virtual gadget begins, you will see something like beneath.
In Metro Bundler, click "Run on Android gadget/emulator" and the application will be stacked in the Android Virtual Gadget.
An application will be stacked or begun in the Android Virtual Gadget.
How about we open the application in Visual Studio Code and snap on App.js record to alter.

To show a basic message, similar to "Hello World", we have to change the content between the Content labels. Change the content to "Hello World" and run the application once more. You will see Hello World on the application.
On checking the QR Code with the Android gadget, you will see the ideal yield too.
Comments
Post a Comment