This tutorial I am going to focus on how to install and build your first React Native application.
There are two methods you can follow to develop React Native app. If you are very new to mobile development and not familiar with setting up mobile development environment, I would suggest to start with Expo CLI. Expo is a set of tools to build React Native application. It has may features; you have to select suitable features to develop your app in minutes. You need only a recent version of Node.js and a phone or emulator. If you want to test your React Native application on your web browser before installing any tools, you may use Snack.
If you are familiar mobile developer from other languages
and want to try out React Native, you may try out React Native CLI. For that
you need to install either Xcode for iOS or Android Studio for Android OS.
If you are a beginner, my personal suggestion is to go for
Expo CLI and familiar with the React Native features and concepts. Actually,
using Expo CLI, you can develop production level application. But when you move
forward there might have some limitation when your application grow to access
very hardware specific features. For example, if your application wants to read
NFC card, get some data from Bluetooth enabled devices…etc you might want to go
for React Native CLI rather Expo CLI. In my own experience I have developed
Expo application for many projects which read mobile device network connection,
camera, Wi-Fi connection and many more. Most important feature is if you write
your Expo app in a such way that you may use same code for iOS and Android OS
as it is. But in React Native CLI most of the time you need to some slight
modifications to build for iOS and Android OS.
Method 1: Expo CLI
Prerequisite is to install Node 12 LTS or greater on your
machine. You can use npm or yarn command to install the Expo CLI command line
utility:
npm install -g expo-cli
yarn global add expo-cli
To create your first React Native project, run following
command:
expo init MyFirstReactNativeProject
cd MyFirstReactNativeProject
npm start # you can also use: expo start
or
expo init MyFirstReactNativeProject
cd MyFirstReactNativeProject
yarn start # you can also use: expo start
This will start a development server for you.
Now you have created your first React Native application.
Next is to run your application and see the results. Don’t get confuse with npm
and yarn commands. Both commands are pretty much similar. Different developers
use either one as their own preference. I don’t have any clear-cut explanation
to use which command. But I always recommend to you only once command through
out your entire project. Don’t mixed up with npm and yarn. That might
complicate your build process, since each has its own dependencies.
Running your React Native application
To run your React Native application you need to install the
Expo client on your phone (iOS or Android). For that you need to share same
wireless network for your computer and the phone. I am using same Wi-Fi router
to connect to the computer and the phone. On Android, use the Expo app to scan
the QR code from your terminal to open your project. On iOS, use the built-in
QR code scanner of the Camera app.
Modifying your app
Now that you have successfully run the app, let's modify it.
Open App.js in your text editor of choice and edit some lines. The application
should reload automatically once you save your change.
Running your app on a simulator or virtual device
Expo CLI allows you to run your React Native app on a
physical device without setting up a development environment. If you want to
run your app on the iOS Simulator or an Android Virtual Device, you need to
install Xcode or set up your Android development environment. This will discuss
in next section of this tutorial.
Once you've set these up, you can launch your app on an
Android Virtual Device by running
npm run android
, or on the iOS Simulator by running
npm run ios (macOS only).
Caveats
So far, you didn’t build any native code when using Expo to
create a project. Since that, you can not include any custom native modules
beyond the React Native APIs and components that are available in the Expo
client app.
If you want to include your own native code, still you can
use Expo project and you’ll need to “eject” the Expo project to convert Expo
project to your own native builds. If you do eject, you need to follow
instructions in next section of this tutorial to continue working on your
project.
Method 2: React Native CLI
To build native code in your project you need to follow
below instructions. If you want to integrate your React Native application into
an existing application or if you want to “eject” your project from Expo still
you need to follow these instructions.
Following instruction are for Windows development OS and
Android target OS.
Installing dependencies
You need to install Node, the React Native command line
interface, a JDK and Android Studio. Even though we install Android Studio, we
are not going to do coding in Android Studio. You can use any editor to code
your React Native project. But Android Studio is necessary to setup your
development environment and virtual devices to test your project.
Node, JDK
You can use many ways to install Node and JDK. But for the
React Native environment setup, I would like to recommend installing Node and
JDK via Chocolatey, a popular package manager for Windows. This will reduce
many dependency issues, that will make headache for many beginners.
To run below commands, you need to have Administrator
permission and open an Administrator Command Prompt (right click Command Prompt
and select "Run as Administrator"), then run the following command:
choco install -y nodejs.install openjdk8
Android development environment
Setting up your development is not straight forward for many
beginners to Android development. If you follow below instruction carefully, I
would guarantee you don’t find any difficulty to run your first React Native
project.
1. Install Android Studio
You need to download and install Android Studio. While on
Android Studio installation wizard, make sure the boxes next to all of the
following items are checked:
Android SDK
Android SDK Platform
Android Virtual Device
If you are not already using Hyper-V: Performance (Intel ®
HAXM) (See here for AMD or Hyper-V)
Then, click "Next" to install all of these components.
Once setup has finalized and you're presented with the
Welcome screen, proceed to the next step.
2. Install the Android SDK
Android Studio setup automatically install the latest
Android SDK, and currently Android 11.0® SDK is available to build a React
Native app with native code. You can install any other SDKs as well if you wish
by selecting required SDK through the SDK Manager in Android Studio.
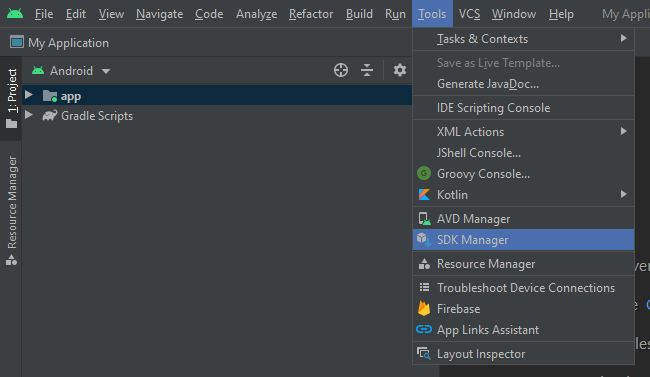
Open Android Studio, click on "Tools" menu and
select "SDK Manager".
 |
| SDK Manager |
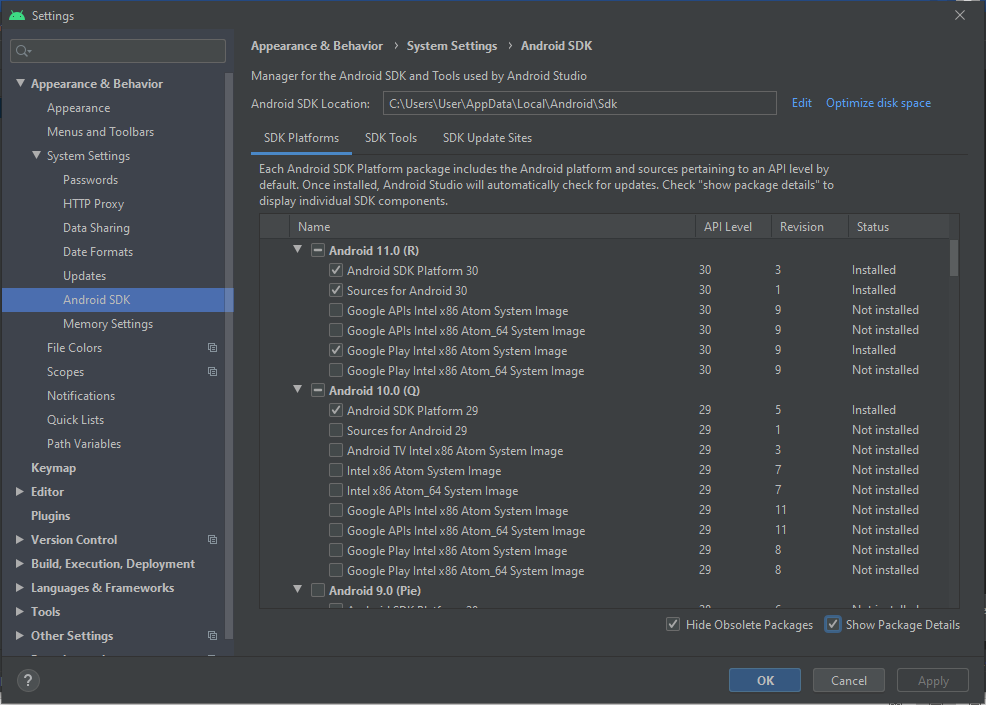
Select the "SDK Platforms" tab from within the SDK
Manager, then check the box next to "Show Package Details" in the
bottom right corner. Look for and expand the Android 11.0 (R) entry, then make
sure the following items are checked:
Android SDK Platform 30
Intel x86 Atom_64 System Image or Google APIs Intel x86 Atom
System Image
Next, select the "SDK Tools" tab and check the box
next to "Show Package Details" here as well. Look for and expand the
"Android SDK Build-Tools" entry, then make sure that 30.0.2 is
selected.
 |
| SDK Tools |
Finally, click "Apply" to download and install the
Android SDK and related build tools.
3. Configure the ANDROID_HOME environment variable
The React Native tools require some environment variables to
be set up in order to build apps with native code.
Open the Windows Control Panel.
Click on User Accounts, then click User Accounts again
Click on Change my environment variables
Click on New... to create a new ANDROID_HOME user variable
that points to the path to your Android SDK:
 |
| Edit Environment Variable ANDROID_HOME |
The SDK is installed, by default, at the following location:
%LOCALAPPDATA%\Android\Sdk
You can find the actual location of the SDK in the Android
Studio "Settings" dialog, under Appearance & Behavior → System
Settings → Android SDK.
Open a new Command Prompt window to ensure the new
environment variable is loaded before proceeding to the next step.
Open powershell
Copy and paste
Get-ChildItem -Path Env:\
into powershell
Verify ANDROID_HOME has been added.
 |
| ANDROID_HOME in PowerShell |
4. Add platform-tools to Path
Open the Windows Control Panel.
Click on User Accounts, then click User Accounts again
Click on Change my environment variables
Select the Path variable.
Click Edit.
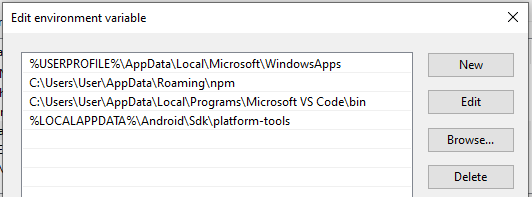
Click New and add the path to platform-tools to the list.
The default location for this folder is:
%LOCALAPPDATA%\Android\Sdk\platform-tools
 |
| Edit PATH variable |
React Native Command Line Interface
React Native has a built-in command line interface. Rather
than install and manage a specific version of the CLI globally, I recommend you
to access the current version at runtime using npx, which ships with Node.js.
With npx react-native <command>, the current stable version of the CLI
will be downloaded and executed at the time the command is run.
Creating a new application
To create new application, you have to use React Native built-in command line interface. You can access it without installing anything globally using npx, which ships with Node.js. Let's create a new React Native project called "MyFirstReactNativeProject":
npx react-native init MyFirstReactNativeProject
Note that this is not necessary if you are integrating React
Native into an existing application, if you "ejected" from Expo, or
if you're adding Android support to an existing React Native project. You can
also use a third-party CLI to init your React Native app, such as Ignite CLI.
Preparing the Android device
You will need an Android device to run your React Native
Android app. This can be either a physical Android device, or more commonly,
you can use an Android Virtual Device which allows you to emulate an Android
device on your computer.
Either way, you will need to prepare the device to run
Android apps for development.
Using a physical device
If you have a physical Android device, you can use it for
development in place of an AVD by plugging it in to your computer using a USB
cable and following the instructions here.
Using a virtual device
You have to use Android Studio to open ./ MyFirstReactNativeProject
/android, you can see the list of available Android Virtual Devices (AVDs) by
opening the "AVD Manager" from within Android Studio. Look for an
icon that looks like this:
 |
| AVD Manager button |
If you don’t see any Virtual Device, you have to create a
new AVD. Select "Create Virtual Device...", then pick any Phone from
the list and click "Next", then select the Q API Level 30 image.
Click "Next" then "Finish" to create
your AVD. At this point you should be able to click on the green triangle
button next to your AVD to launch it, then proceed to the next step.
 |
| Virtual Devices Pixel 2 API 30 |
Once you click on green play button, it will load the
selected virtual device.
 |
| Emulator running |
Running your React Native application
Step 1: Start Metro
First, you will need to start Metro, the JavaScript bundler
that ships with React Native.
To start Metro, run npx react-native start inside your React
Native project folder:
npx react-native start
react-native start starts Metro Bundler.
Step 2: Start your application
Let Metro Bundler run in its own terminal. Open a new
terminal inside your React Native project folder. Run the following:
npx react-native run-android
npx react-native run-android is one way to run your app -
you can also run it directly from within Android Studio.
Modifying your app
Now that you have successfully run the app, let's modify it.
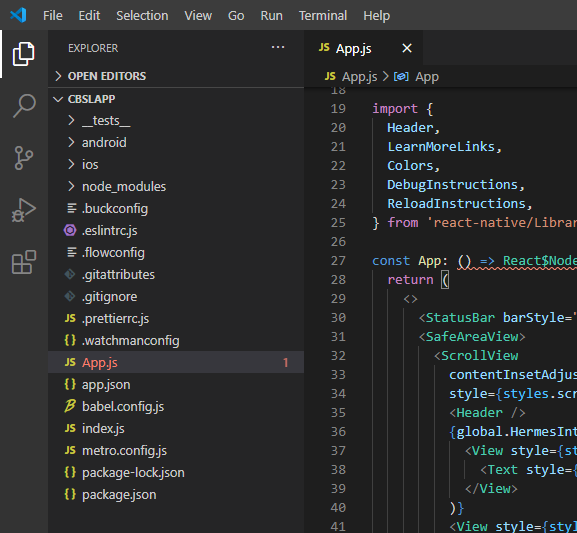
Open App.js in your text editor of choice and edit some
lines.
 |
| Modify App.js in editor |
Press the R key twice or select Reload from the Developer Menu (Ctrl + M) to see your changes!


Comments
Post a Comment