LightBlog
Showing posts with label NgFor. Show all posts

Saturday, 23 January 2021

How to use Angular HttpClient and RxJS to consume REST API

January 23, 2021 0
Angular HttpClient and RxJS


Today I am going to discuss how you can interact with REST API services to load and manage data. 

Prerequisites

Before getting started, you need to have the below software installed on your development machine:

Node.js and npm. You can install both of them from the Node.js

Angular CLI  (You can install it from npm using: npm install -g @angular/cli)


Frontend applications needs to call backend services over http/https protocol to manage dynamic data. Best place to access data from backend APIs are service component. Once you defined your service class you can inject it in to component or another service to use the service methods. 

Angular Related Articles:

Angular provides the HttpClient service class in @angular/common/http module to interact with backend REST API services.

Using HttpClient request call you can easily handle your response and you can intercept your request and response. By intercepting the request, you can inject your security token or any other requested headers to all the service inside the one place. By intercepting the response, you can handle all the errors in a single place. I will explain interceptor concept in another chapter with more details. 

Today we will check how you can use HttpClient methods to do get data from service API. Get method of HTTP Client returns RxJS observable type and you can subscribe to the RxJS observable inside the component where you call the service method.

If you look at my flower store code in GitHub, you can see I have hard coded flower objects and put them into an array as below. 


  mySellingFlowers(){
    let rose = new flower();
    rose.name = "Rose";
    rose.price = 100;
    rose.availableQuantity = 1000;
    rose.isChecked = false;
    this. myFlowerList.push(rose);

    let lily = new flower();
    lily.name = "Lilly";
    lily.price = 80;
    lily.availableQuantity = 2000;
    lily.isChecked = false;
    this. myFlowerList.push(lily);

    let tulip = new flower();
    tulip.name = "Tulip";
    tulip.price = 100;
    tulip.availableQuantity = 2300;
    lily.isChecked = false;

    this. myFlowerList.push(tulip);

    let carnation = new flower();
    carnation.name = "Carnation";
    carnation.price = 50;
    carnation.availableQuantity = 1500;
    lily.isChecked = false;

    this. myFlowerList.push(carnation);

    let gerbera = new flower();
    gerbera.name = "Gerbera";
    gerbera.price = 50;
    gerbera.availableQuantity = 1500;
    lily.isChecked = false;

    this. myFlowerList.push(gerbera);

    let orchid = new flower();
    orchid.name = "Orchid";
    orchid.price = 50;
    orchid.availableQuantity = 1500;
    lily.isChecked = false;

    this. myFlowerList.push(orchid);

  }
  
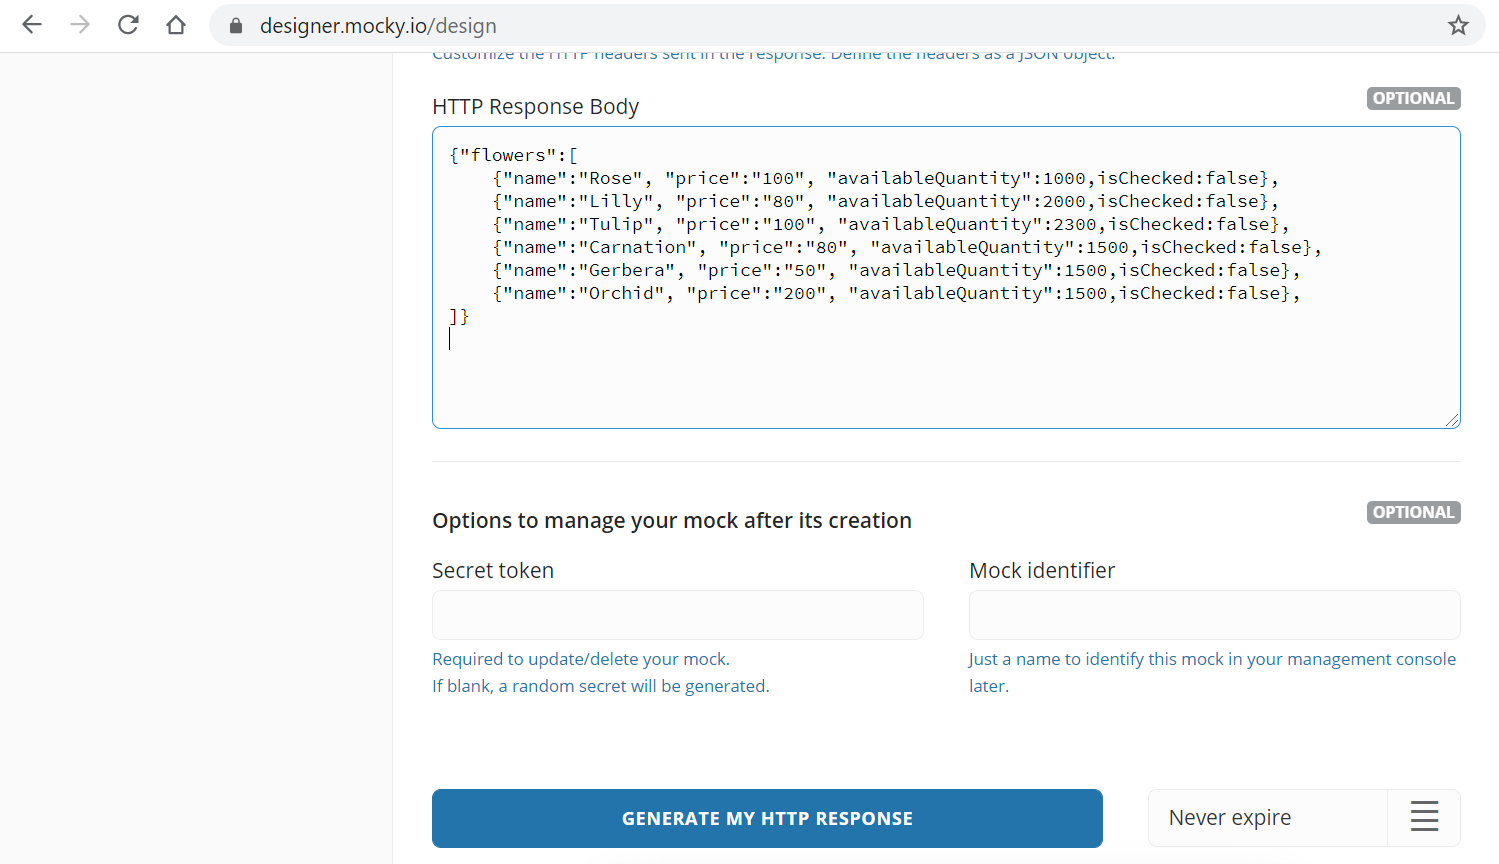
Today we will check how you can read flowers from backend REST API call. I am planning to use designer.mocky.io to mock my API call. To access list of flowers through API and to read it from Angular side that API should return an JOSN array. Therefor I will make a JSON array to define a response in my mock API as below.

{"flowers":[  
    {"name":"Rose", "price":"100", "availableQuantity":"1000","isChecked":false},    
    {"name":"Lilly", "price":"80", "availableQuantity":"2000","isChecked":false},  		
    {"name":"Tulip", "price":"100", "availableQuantity":"2300","isChecked":false},  	   
    {"name":"Carnation", "price":"80", "availableQuantity":"1500","isChecked":false}, 
    {"name":"Gerbera", "price":"50", "availableQuantity":"1500","isChecked":false},   
    {"name":"Orchid", "price":"200", "availableQuantity":"1500","isChecked":false}   
]
}
]}

https://designer.mocky.io/ to mock my API call

Click on the generate my http response button to get the access URL. In my case it is as below.

Click on the generate my http response button to get the access run.mocky.io/v3

Now let us see how you can access this URL and display data in html. As I said earlier best place to access the data layer is service class.

To generate the service, please run below CLI command in your command prompt. 

ng g s flower
ng g s flower command

Above command generate the default flower service as below.


import { Injectable } from '@angular/core';

@Injectable({
  providedIn: 'root'
})
export class FlowerService {

  constructor() { }
}

  
The @Injectable() decorator specifies that Angular can use this class with the Dependency Injection.

The metadata, providedIn: 'root', means that the FlowerService is visible throughout the application.
Now we will write a new method in a FlowerService class to access our API end point.

The HttpClient service in Angular 4.3+ is the successor to Angular 2's Http service. Instead of returning a Promise, its http.get() method returns an RxJS Observable object.

Therefore, to call our get API method I will import the HttpClient from Angualr/common/http and Observable module from RxJS. and then injected that to our service class as below.


import { Injectable } from '@angular/core';
import { HttpClient, HttpHeaders } from '@angular/common/http';
import { Observable } from 'rxjs';

@Injectable({
  providedIn: 'root'
})
export class FlowerService {

  constructor(private http:HttpClient) {}

    getFlowerList():Observable<any>{
      return this.http.get('https://run.mocky.io/v3/cee1c6e9-1491-4191-9054-ce7df1c1a500');
   }
}

  
getFlowerLIst() methods returns RxJS observable type and later in the landing component you can subscribe to access data.

To consume getFlowerList() method in our landing component we need to inject our service in to landing component through constructor and need to subscribe to the method.


constructor(private flowerService:FlowerService) { }
I have commented out my array with hard coded data and add the below codes to read data from service method.


this.flowerService.getFlowerList().subscribe(response=>{
      this.myFlowerList = response.flowers
    },
    err => console.error(err),
    () => console.log('done loading foods')
   )
I have added full code for landing component for you to refer. 


import { Component, EventEmitter, OnInit, Output, ViewEncapsulation } from '@angular/core';
import { flower } from '../../domain/flower';
import { DataService } from 'src/app/services/data.service';
import { FlowerService } from 'src/app/services/flower.service';

@Component({
  selector: 'app-landing',
  templateUrl: './landing.component.html',
  styleUrls: ['./landing.component.scss'],
 
})
export class LandingComponent implements OnInit {

  myFlowerList:flower[]=[];
  selectedFlowers: string[] =[];

  checkedList:string[]=[];
  searchText:string='';
  constructor(private dataService:DataService, private flowerService:FlowerService) { }

  ngOnInit() {
    this.mySellingFlowers();
    this.dataService.getSearchText().subscribe(response => {
      this.printSearchtext(response);
    })
  }

  printSearchtext(searchText){
    this.searchText = searchText;
  }

  printOrder(flowerName){
    if(this.selectedFlowers.indexOf(flowerName)<0){
      this.selectedFlowers.push(flowerName)
    }
    else{
      let index = this.selectedFlowers.indexOf(flowerName);
      this.selectedFlowers.splice(index,1);
    }

  }

  mySellingFlowers(){
    // let rose = new flower();
    // rose.name = "Rose";
    // rose.price = 100;
    // rose.availableQuantity = 1000;
    // rose.isChecked = false;
    // this. myFlowerList.push(rose);

    // let lily = new flower();
    // lily.name = "Lilly";
    // lily.price = 80;
    // lily.availableQuantity = 2000;
    // lily.isChecked = false;
    // this. myFlowerList.push(lily);

    // let tulip = new flower();
    // tulip.name = "Tulip";
    // tulip.price = 100;
    // tulip.availableQuantity = 2300;
    // lily.isChecked = false;

    // this. myFlowerList.push(tulip);

    // let carnation = new flower();
    // carnation.name = "Carnation";
    // carnation.price = 50;
    // carnation.availableQuantity = 1500;
    // lily.isChecked = false;

    // this. myFlowerList.push(carnation);

    // let gerbera = new flower();
    // gerbera.name = "Gerbera";
    // gerbera.price = 50;
    // gerbera.availableQuantity = 1500;
    // lily.isChecked = false;

    // this. myFlowerList.push(gerbera);

    // let orchid = new flower();
    // orchid.name = "Orchid";
    // orchid.price = 50;
    // orchid.availableQuantity = 1500;
    // lily.isChecked = false;

    // this. myFlowerList.push(orchid);

    this.flowerService.getFlowerList().subscribe(response=>{
      this.myFlowerList = response.flowers
    },
    err => console.error(err),
    () => console.log('done loading foods')
   )

  }

  trackFlowers(index,flower){
    return flower?flower.name:undefined
  }
}

  
The subscribe() method takes three arguments which are event handlers. They are called onNext, onError, and onCompleted. 

The onNext method will receive the HTTP response data

The onError event handler is called if the HTTP request returns an error code such as a 500. 

The onCompleted event handler executes after the Observable has finished returning all its data. 

myFlowerList array contains data return from the API call and using *ngFor you can iterate and display it in a HTML as below.


<div *ngFor="let flower of myFlowerList;trackBy:trackFlowers">
      <flower-card [title]="flower.name" (selectedFlower)="printOrder($event)"></flower-card>
</div>
To use the Angular HttpClient, we need to inject it into our app's dependencies in app.module.ts file as below.


imports: [
    BrowserModule,
    AppRoutingModule,
    CardModule,
    CheckboxModule,
    CommonModule,
    FormsModule,
    InputTextModule,
    HttpClientModule
    ],
Unless it gives you below error.

core.js:7187 ERROR Error: Uncaught (in promise): NullInjectorError: StaticInjectorError(AppModule)[HttpClient]: 
  StaticInjectorError(Platform: core)[HttpClient]: 
    NullInjectorError: No provider for HttpClient!
NullInjectorError: StaticInjectorError(AppModule)[HttpClient]:
I have added app.module.ts file code after adding the dependency and you can check full code to the app by accessing GitHub.


import { BrowserModule } from '@angular/platform-browser';
import { NgModule } from '@angular/core';

import { AppRoutingModule } from './app-routing.module';
import { AppComponent } from './app.component';
import { LandingComponent } from './modules/landing/landing.component';
import { HomeComponent } from './modules/home/home.component';
import { CardModule } from 'primeng/card';
import {CheckboxModule} from 'primeng/checkbox';
import { CommonModule } from '@angular/common';
import { FormsModule }    from '@angular/forms';
import {InputTextModule} from 'primeng/inputtext';
import { FlowerCardComponent } from './modules/cards/flower-card/flower-card.component';
import { HttpClientModule } from '@angular/common/http';

@NgModule({
  declarations: [
    AppComponent,
    LandingComponent,
    HomeComponent,
    FlowerCardComponent
  ],
  imports: [
    BrowserModule,
    AppRoutingModule,
    CardModule,
    CheckboxModule,
    CommonModule,
    FormsModule,
    InputTextModule,
    HttpClientModule
    
  ],
  providers: [],
  bootstrap: [AppComponent]
})
export class AppModule { }
Once you load the app it will show same data as before by getting the data from backend API call.

My Flower Store Angular App

Conclusion

In this tutorial, we used HttpClient and RxJS modules to retrieves data from a REST API using the get() method of HttpClient. First I have explained how you can generate service component using the CLI command. Then I have described how  to subscribe to the RxJS Observable returned by the get() method and how to use the *ngFor directive to iterate over fetched data in the template. 

Tuesday, 8 December 2020

Angular NgFor directive and trackby

December 08, 2020 0
angular ngfor trackby example


Today we will learn about NgFor one of the core directive of angular. NgFor helps to build list and tables in Angular


Let us see the example in our flower store app. In the landing page I am going to print list of flowers that are available in the store. Later we will add images and show them in a carousel to rotate automatically.


First we will create the domain class called flower.ts and you can copy paste below code. 


export class flower{
  constructor() { }
  name:string='';
  price:number = 0;
  availableQuantity:number = 0
}


To use this domain class inside another component you must specify export keyword along with the class keyword.

Flower domain has 3 attributes to store name of the flower then price and the available quantity.

Now we can create the array from the flower type as below inside the landing.component.ts file.


myFlowerList:flower[]=[];


I will call a method inside ngOnInit to add values to the array as below.

ngOnInit is one of the life cycle hooks used in angular and it executed only one time when component is initiating.


ngOnInit() {
    this.mySellingFlowers();
  }

  mySellingFlowers(){
    let rose = new flower();
    rose.name = "Rose";
    rose.price = 100;
    rose.availableQuantity = 1000;
    this. myFlowerList.push(rose);

    let lily = new flower();
    lily.name = "Lily";
    lily.price = 80;
    lily.availableQuantity = 2000;
    this. myFlowerList.push(lily);

    let tulip = new flower();
    tulip.name = "Tulip";
    tulip.price = 100;
    tulip.availableQuantity = 2300;
    this. myFlowerList.push(tulip);

    let carnation = new flower();
    carnation.name = "Carnation";
    carnation.price = 50;
    carnation.availableQuantity = 1500;
    this. myFlowerList.push(carnation);
  }


Now we have an array with different flowers. Let’s see how we can iterate the array using ngFor directive.

Copy paste below code in you landing.component.html file.


<ul>
    <li *ngFor="let flower of myFlowerList">
        {{flower.name}}
    </li>
</ul>


myFlowerList is the array that we defined and initiated in the landing.component.ts file.

*ngFor is helping to loop the array element and it will hold each element in flower object and you can access it properties with the . operator.

{{}} is called interpolation and it will print the value of the variable in your browser.

Now let’s check our browser. Here it is.


angular ngfor trackby example - flower store

Finding the index of a list element


Now let’s see how you can track the index of each element and use that index to generate unique id for each flower element.


<ul>

    <li *ngFor="let flower of myFlowerList;let i = index">

        <span id="flower_{{i}}">{{flower.name}}</span>

    </li>

</ul>
track the index of each element and use that index to generate unique id

How to use trackBy?

Track by function is using to improve performance. If you don’t use track by function whenever your array get change it will reload the whole DOM object but with track by function it will change only that element.


To use trackby function you can update landing.component.html file as below


<ul>
    <li *ngFor="let flower of  myFlowerList;trackBy:trackFlowers">
        <span >{{flower.name}}</span>
    </li>
</ul>


Then define the trackFlower function in landing.component.ts file as below.


trackFlowers(index,flower){
    return flower?flower.name:undefined
}

I hope you enjoyed the post. In next post we will apply some styles and background flower images to our flower list.


LightBlog