LightBlog
Showing posts with label @Input. Show all posts

Monday, 28 December 2020

Angular share data between parent child components using @Input and @Output decorators

December 28, 2020 0
Angular share data between parent child components


Last chapter we have discussed how we can share data between two unrelated components using behavioral subjects in Angular 8. Today I am going to explain how you can make an interaction between parent and child component using Angular.

Before moving forward, I will generate one component in my flower store angular app. Flower store is the app we used to demonstrate the angular concept talked in series of chapters in this blog. 

To generate the component, please run below ng CLI command in your command prompt. 

ng g c flower-card

Above command will generate the flower-card.component.ts and corresponding html and CSS files as below.


run cli command ng g c flower-card to generate the component in angular

Angular Related Articles:


In our flower app component landing page view has cards for each flower as below.

landing page of my flower store angular app


Currently your landing.component.html includes all the code to display cards. Below commented lines used to shows cards for each flower. 


<h1>Welcome to my flower store</h1>

    <div *ngFor="let flower of myFlowerList;trackBy:trackFlowers">
        <!-- <p-card header="{{flower.name}}"  [style]="{width: '360px','float':'left','margin-bottom': '2em','margin-right': '2em','background-color':'light-pink'}" styleClass="p-card-shadow">
                <img alt="Card" width="100" height="100" src="assets/stock/{{flower.name}}.jpg">
            <p>Lorem ipsum dolor sit amet, consectetur adipisicing elit. Inventore sed consequuntur error repudiandae numquam deserunt
                quisquam repellat libero asperiores earum nam nobis, culpa ratione quam perferendis esse, cupiditate neque quas!</p>
                <p-checkbox name="flower" [style]="{'margin-top': '2em'}" value="{{flower.name}}" label="Order Now" [(ngModel)]="selectedFlowers"></p-checkbox>
             
            </p-card> -->
    </div>

    <div>Your search text is: {{searchText}}</div>

    <ul>
        <li *ngFor="let selectedFlower of selectedFlowers">
            <input id="select-user" type="checkbox" (change)="onCheckboxChange(selectedFlower,$event)"> {{selectedFlower}}

        </li>
    </ul>


I am going to replace commented lines by adding selected tags of flower-card component and I am going to move card displaying logic in to flower-card.component.html.

<h1>Welcome to my flower store</h1>

    <div *ngFor="let flower of myFlowerList;trackBy:trackFlowers">
      <flower-card></flower-card>
    </div>

    <div>Your search text is: {{searchText}}</div>

    <ul>
        <li *ngFor="let selectedFlower of selectedFlowers">
            <input id="select-user" type="checkbox" (change)="onCheckboxChange(selectedFlower,$event)"> {{selectedFlower}}

        </li>
    </ul>

<flower-card> is a selector tag in the flower-card component file. Below is the flower-card.component.ts file code for you to understand.

import { Component, OnInit } from '@angular/core';

@Component({
  selector: 'flower-card', // selector 
  templateUrl: './flower-card.component.html',
  styleUrls: ['./flower-card.component.scss']
})
export class FlowerCardComponent implements OnInit {

  constructor() { }

  ngOnInit() {
  }
}


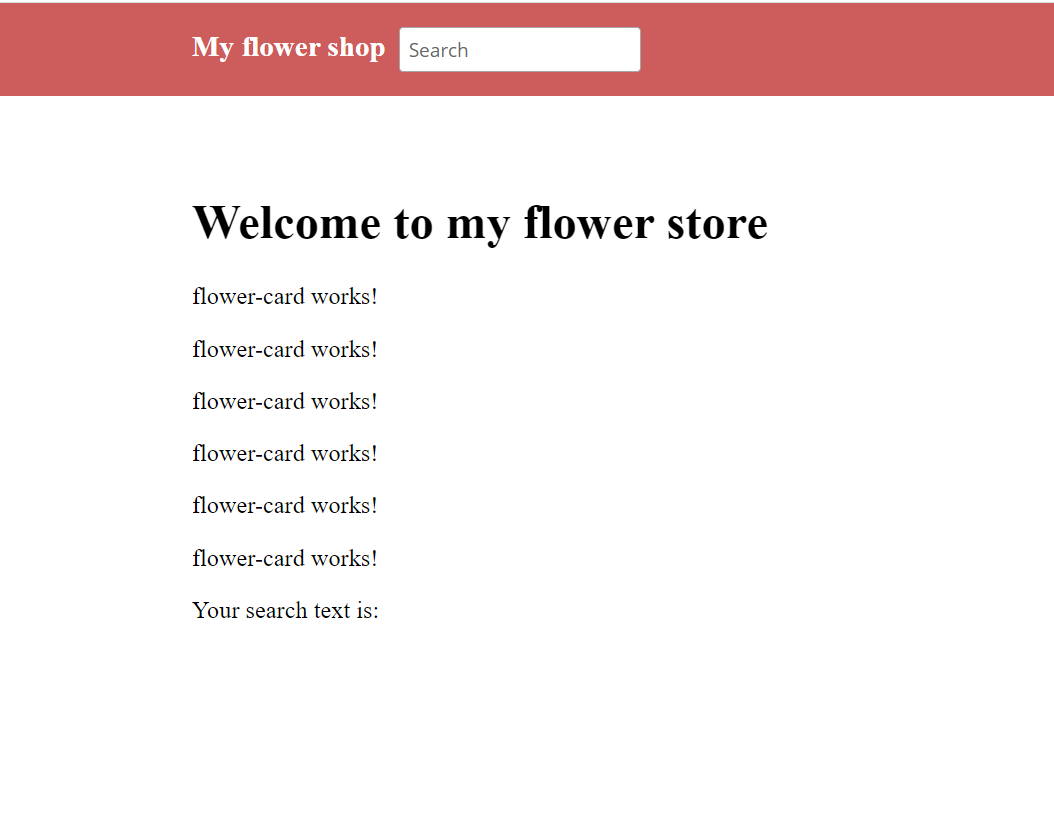
Now if I run my app you will see below screen because I still did not add any codes to flower-card.component.html file to shows flowers as a card.

flower-card.component.html file to shows flowers as a card

Pass data between parent component to child component in Angular

Now let’s focus on how to pass data from parent component (landing.component.ts) to child component (flower-card.component.ts). 

Now my flower array is defined inside the parent component and I am going to display data in child component. Now I must find a way to transfer data from parent to child component. 

In this case, we send the data from the parent component to the child component using an attribute. This attribute can then be accessed within the child component using the @input decorator.

Properties I need to pass from parent to child are only title or name of the flower since I used dummy text to display description.

I am using the title to read the image also. 

Now let us check how we can bind the attributes to child component from parent component below. There are two ways you can bind data.

<flower-card title="{{flower.name}}"></flower-card>

OR

<flower-card [title]="flower.name"></flower-card>

You can bind another attribute like description as below.

<flower-card [title]="flower.name" [description]="flower.description"></flower-card>

<h1>Welcome to my flower store</h1>

    <div *ngFor="let flower of myFlowerList;trackBy:trackFlowers">
      <!-- <flower-card title="{{flower.name}}"></flower-card> -->
      <flower-card [title]="flower.name"></flower-card>
   </div>

    <div>Your search text is: {{searchText}}</div>

    <ul>
        <li *ngFor="let selectedFlower of selectedFlowers">
            <input id="select-user" type="checkbox" (change)="onCheckboxChange(selectedFlower,$event)"> {{selectedFlower}}

        </li>
    </ul>


Now we have banded data from parent component to child component. Let us see how we can read these data from child component <flower-card-component>

To read data you should defined @Input() decorators. You need to import Input decorator from @angular/core to use @Input.

@Input() title:string =''

flower-card.component.ts file code.

import { Component, Input, OnInit } from '@angular/core';

@Component({
  selector: 'flower-card', // selector 
  templateUrl: './flower-card.component.html',
  styleUrls: ['./flower-card.component.scss']
})
export class FlowerCardComponent implements OnInit {

  constructor() { }
  
  @Input() title:string =''
  
  ngOnInit() {
  
  }
}}

Then I will copy paste commented code in parent component html (landing.component.html) file to child component html file and alter the file to display @input type variable value. (flower-card-component.html).

Since I am using PrimeNG component to display card and checkbox I will import PrimeNG modules in flower-card.component.ts file. Then I will move card style related code from landing.component.sccs to flower-card.component.scss file.

flower-card.component.html code:

<p-card header="{{title}}"  [style]="{width: '360px','float':'left','margin-bottom': '2em','margin-right': '2em','background-color':'light-pink'}" styleClass="p-card-shadow">
    <img alt="Card" width="100" height="100" src="assets/stock/{{title}}.jpg">
    <p>Lorem ipsum dolor sit amet, consectetur adipisicing elit. Inventore sed consequuntur error repudiandae numquam deserunt
        quisquam repellat libero asperiores earum nam nobis, culpa ratione quam perferendis esse, cupiditate neque quas!</p>
    <p-checkbox name="flower" [style]="{'margin-top': '2em'}" value="{{title}}" label="Order Now" [(ngModel)]="selectedFlowers"></p-checkbox>
</p-card>

flower-card.component.scss code:

.ui-card-title{
    background-color: lightpink !important;
}

.ui-chkbox-label{
    vertical-align:bottom;
}

Pass data between child component to parent component in Angular

In our previous application when user click on the checkboxes in each card checkbox value is bonded to the array using ngModel. So selected flower names will be stored in an array and you can directly print the value by iterating the array.

Now our checkbox is in child component and our printing logic is in parent component. So, you need to find a way to print the value when and checkbox checked event called in the child component.

To have child to parent communication we can capture the change in data due to any event within the child component. This event is then propagated to the parent component using the @Output decorator and Eventemitter.

First, I will define the object as below.

@Output() selectedFlower = new EventEmitter<string>();

To use @Output and EventEmitter you must import EventEmitter and Output component from @angular/core library.

In flower-card.component.html file I have added the check box change event. So, I can capture that event and emit it value to parent component as below. Since I used PrimeNG checkbox you must use (onChange) event.

<p-card header="{{title}}"  [style]="{width: '360px','float':'left','margin-bottom': '2em','margin-right': '2em','background-color':'light-pink'}" styleClass="p-card-shadow">
    <img alt="Card" width="100" height="100" src="assets/stock/{{title}}.jpg">
    <p>Lorem ipsum dolor sit amet, consectetur adipisicing elit. Inventore sed consequuntur error repudiandae numquam deserunt
        quisquam repellat libero asperiores earum nam nobis, culpa ratione quam perferendis esse, cupiditate neque quas!</p>
    <p-checkbox name="flower" [style]="{'margin-top': '2em'}" value="{{title}}" label="Order Now" (onChange)="selectCheckBox($event,title)" [(ngModel)]="selectedFlowers"></p-checkbox>
</p-card>

Then I am going to define the selectCheckBox event in flower-card.component.ts to emit the selected value.

selectCheckBox(value,name){
    this.selectedFlower.emit(name);
  }

import { Component, EventEmitter, Input, OnInit, Output, ViewEncapsulation } from '@angular/core';
import {CardModule} from 'primeng/card';
import {CheckboxModule} from 'primeng/checkbox';

@Component({
  selector: 'flower-card', // selector 
  templateUrl: './flower-card.component.html',
  styleUrls: ['./flower-card.component.scss'],
  encapsulation: ViewEncapsulation.None
})
export class FlowerCardComponent implements OnInit {

  constructor() { }

  @Input() title:string =''
  selectedFlowers: string[] = [];
  @Output() selectedFlower = new EventEmitter<string>();

  
  ngOnInit() {
  
  }

  selectCheckBox(value,name){
    this.selectedFlower.emit(name);
  }
}

Now we have implemented the code in child component. Let’s see how you can capture this emitted value and print it in a parent component.

For that you must bind the emitted event in a child component selected tag as below.

<flower-card [title]="flower.name" (selectedFlower)="printOrder($event)"></flower-card>

Here the bind event name should be same as the @Output name we defined in child component.
So now whenever user click on child component checkboxes that event is emitted to the parent component and printOrder() method defined in parent component will be executed. $event argument will contain the emitted value.

Inside the printOrder() method I have implemented the logic to check values is exist, if exist value will be remove from the array and if not value will be added to the array.

printOrder(flowerName){
    if(this.selectedFlowers.indexOf(flowerName)<0){
      this.selectedFlowers.push(flowerName)
    }
    else{
      let index = this.selectedFlowers.indexOf(flowerName);
      this.selectedFlowers.splice(index,1);
    }
}

Parent component code:

<h1>Welcome to my flower store</h1>

    <div *ngFor="let flower of myFlowerList;trackBy:trackFlowers">
      <flower-card [title]="flower.name" (selectedFlower)="printOrder($event)"></flower-card>
       </div>

    <div>Your have selected: {{searchText}}</div>

    <ul>
        <li *ngFor="let selectedFlower of selectedFlowers">
             {{selectedFlower}}

        </li>
    </ul>


import { Component, EventEmitter, OnInit, Output, ViewEncapsulation } from '@angular/core';
import { flower } from '../../domain/flower';
import { DataService } from 'src/app/services/data.service';

@Component({
  selector: 'app-landing',
  templateUrl: './landing.component.html',
  styleUrls: ['./landing.component.scss'],
 
})
export class LandingComponent implements OnInit {

  myFlowerList:flower[]=[];
  selectedFlowers: string[] =[];

  checkedList:string[]=[];
  searchText:string='';
  constructor(private dataService:DataService) { }

  ngOnInit() {
    this.mySellingFlowers();
    this.dataService.getSearchText().subscribe(response => {
      this.printSearchtext(response);
    })
  }

  printSearchtext(searchText){
    this.searchText = searchText;
  }

  printOrder(flowerName){
    if(this.selectedFlowers.indexOf(flowerName)<0){
      this.selectedFlowers.push(flowerName)
    }
    else{
      let index = this.selectedFlowers.indexOf(flowerName);
      this.selectedFlowers.splice(index,1);
    }

  }

  mySellingFlowers(){
    let rose = new flower();
    rose.name = "Rose";
    rose.price = 100;
    rose.availableQuantity = 1000;
    rose.isChecked = false;
    this. myFlowerList.push(rose);

    let lily = new flower();
    lily.name = "Lilly";
    lily.price = 80;
    lily.availableQuantity = 2000;
    lily.isChecked = false;
    this. myFlowerList.push(lily);

    let tulip = new flower();
    tulip.name = "Tulip";
    tulip.price = 100;
    tulip.availableQuantity = 2300;
    lily.isChecked = false;

    this. myFlowerList.push(tulip);

    let carnation = new flower();
    carnation.name = "Carnation";
    carnation.price = 50;
    carnation.availableQuantity = 1500;
    lily.isChecked = false;

    this. myFlowerList.push(carnation);

    let gerbera = new flower();
    gerbera.name = "Gerbera";
    gerbera.price = 50;
    gerbera.availableQuantity = 1500;
    lily.isChecked = false;

    this. myFlowerList.push(gerbera);

    let orchid = new flower();
    orchid.name = "Orchid";
    orchid.price = 50;
    orchid.availableQuantity = 1500;
    lily.isChecked = false;

    this. myFlowerList.push(orchid);

  }

  trackFlowers(index,flower){
    return flower?flower.name:undefined
  }
}

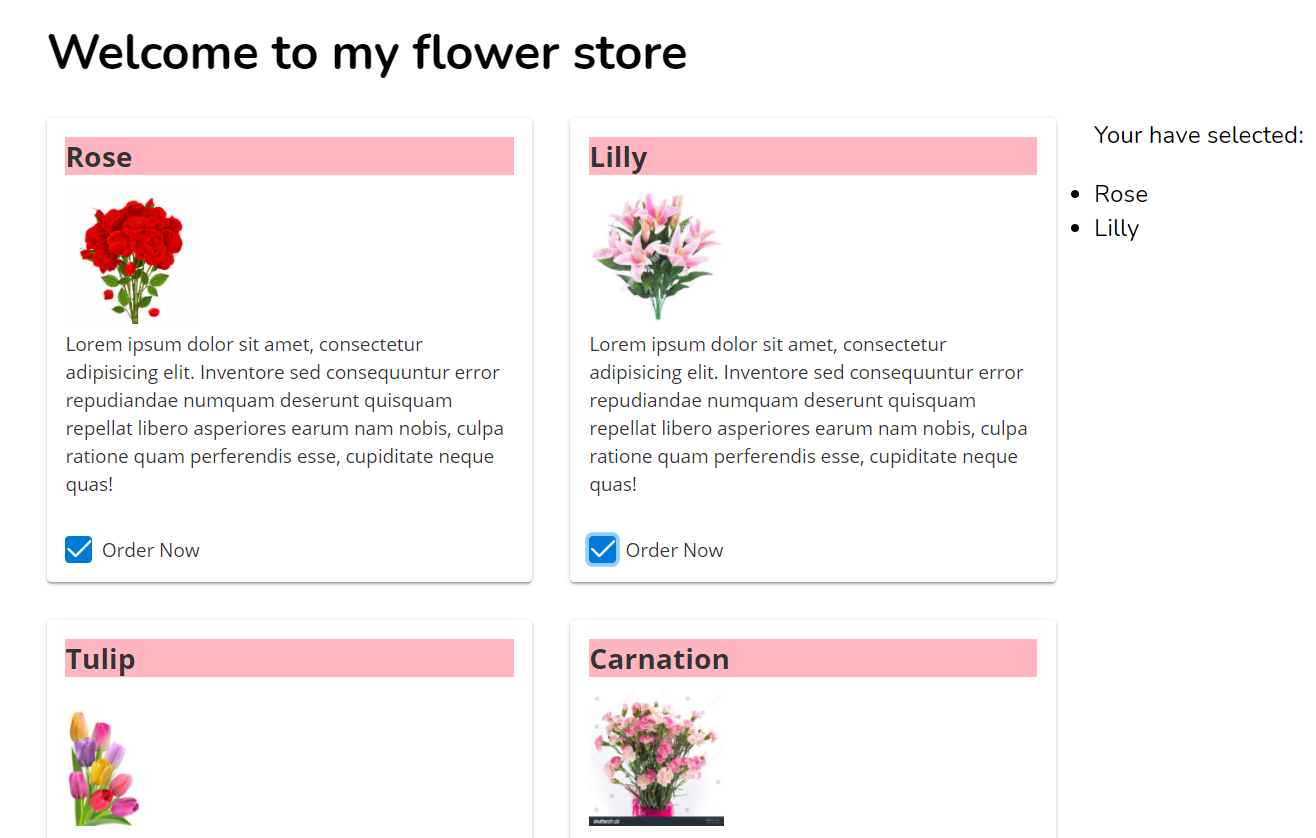
Now see the magic in your browser by clicking on the checkboxes.

click on checkboxes to select items in store


You can find complete source code related to the angular implementation we have done so far here in GitHub.


Friday, 18 December 2020

How to share data between components in angular

December 18, 2020 0


sharing data between unrelated components angular

Today I am going to talk about how we can make interaction between two different components in angular.

There are two main approaches that we can follow.

1. If the two components are not relative, then you can use behavioral subjects to share data and trigger the event in one component, based on the value change in another component.

2. If the component is a child component of another component, then you can share data using @Input and @output directives

Today in this chapter we will discuss on the first approach.

How you can use Behavior subject to share between two components. 

The BehaviorSubject holds the value that needs to be shared with other components.

I will explain the concept using our flower store app.

First, I will add PrimeNG text filed to the app.component.html file.

To add the text field you have to import it in app.module.ts and also in app.component.ts file


import { BrowserModule } from '@angular/platform-browser';
import { NgModule } from '@angular/core';

import { AppRoutingModule } from './app-routing.module';
import { AppComponent } from './app.component';
import { LandingComponent } from './modules/landing/landing.component';
import { HomeComponent } from './modules/home/home.component';
import { CardModule } from 'primeng/card';
import {CheckboxModule} from 'primeng/checkbox';
import { CommonModule } from '@angular/common';
import { FormsModule }    from '@angular/forms';
import {InputTextModule} from 'primeng/inputtext';

@NgModule({
  declarations: [
    AppComponent,
    LandingComponent,
    HomeComponent
  ],
  imports: [
    BrowserModule,
    AppRoutingModule,
    CardModule,
    CheckboxModule,
    CommonModule,
    FormsModule,
    InputTextModule
    
  ],
  providers: [],
  bootstrap: [AppComponent]
})
export class AppModule { }
  
Also need to import it inside app.component.ts. The ViewEncapsulation.None line need to add if you want to override PrimeNG styles inside your component.css file.


import { Component, ViewEncapsulation } from '@angular/core';
import {InputTextModule} from 'primeng/inputtext';

@Component({
  selector: 'app-root',
  templateUrl: './app.component.html',
  styleUrls: ['./app.component.scss'],
  encapsulation: ViewEncapsulation.None

})
export class AppComponent {
  title = 'my-flower-store';
  searchText:string='';
  

In app.component.html file I have added the PrimeNG text filed as below.


<header>
  <div class="container">
    <a href="" class="logo">My flower shop</a>
  <span [style]="{'padding-left':'10px'}" >
      <input type="text" pInputText placeholder="Search" [(ngModel)]="searchText" />
  </span>
    <nav>
      <ul>
        <li><a href="" routerLink="/">Landing</a></li>
        <li><a href="" routerLink="/home">Home</a></li>
      </ul>
    </nav>
  </div>
</header>

<div class="container">
  <router-outlet></router-outlet>
</div>
  
Now once I refresh my browser, I can see below view which has the input text filed to enter search text.

input text filed to enter search text


Now what I am trying to do is I am going to display search text in my landing.component.html file.

Here the challenge I have is my search filed is in one component (app.component.html) and my flower cards in another component (landing.component.html). These two components don’t have any relationship.

How can I get the search text value from app.component.ts to landing.component.ts.

Here comes the angel Behavior Subject to support me.

Let me explain what you need to do to share the search text value using behavior subject concept.

First, I am going to generate the service class. To generate go inside the service folder and type below command.

>ng g s data

‘g’ and ‘s’ means generate service and then the ‘data’ is service name. This will create two files inside src/app/service folder


data.service.spec.ts and data.service.ts in src/app/service folder


Inside the data service class, you can define the BehaviorSubject variable from string type to hold search text value.

Inside the constructor I have initialize it with empty string.

private searchText: BehaviorSubject<string>;

  constructor() {
    this.searchText = new BehaviorSubject<string>('');

   }
  
Then I am going to add getters and setters as below.


  public getUserName() {
    return this.userName.asObservable();
  }

  public changeUserName(newUserName) {
    this.userName.next(newUserName);
  

Now we have done with implementing shared data service class to handle behavioral subjects. Please see service code below.


import { Injectable } from '@angular/core';
import { BehaviorSubject } from 'rxjs';

@Injectable({
  providedIn: 'root'
})

export class DataService {

  private searchText: BehaviorSubject<string>;

  constructor() {
    this.searchText = new BehaviorSubject<string>('');
   }

   public getSearchText() {
    return this.searchText.asObservable();
  }

  public setSearchText(searchText) {
    this.searchText.next(searchText);
  }
}
  

Now I can subscribe to this getSearchText() method from my landing.component.ts where I want to print new search text.

I need to inject my service class to the landing.component.ts file through the constructor.

Before inject I have imported the data.service.ts in my landing.component.ts file.


import { Component, OnInit, ViewEncapsulation } from '@angular/core';
import { flower } from '../../domain/flower';
import {CardModule} from 'primeng/card';
import {CheckboxModule} from 'primeng/checkbox';
import { DataService } from 'src/app/services/data.service';

@Component({
  selector: 'app-landing',
  templateUrl: './landing.component.html',
  styleUrls: ['./landing.component.scss'],
  encapsulation: ViewEncapsulation.None
})

export class LandingComponent implements OnInit {

  myFlowerList:flower[]=[];
  selectedFlowers: string[] = [];
  checkedList:string[]=[];
  searchText:string='';
  constructor(private dataService:DataService) { }

  ngOnInit() {
    this.mySellingFlowers();
    this.dataService.getSearchText().subscribe(response => {
      this.printSearchtext(response);
    })
  }

  printSearchtext(searchText){
    this.searchText = searchText;
  }

  mySellingFlowers(){
    let rose = new flower();
    rose.name = "Rose";
    rose.price = 100;
    rose.availableQuantity = 1000;
    rose.isChecked = false;
    this. myFlowerList.push(rose);

    let lily = new flower();
    lily.name = "Lilly";
    lily.price = 80;
    lily.availableQuantity = 2000;
    lily.isChecked = false;
    this. myFlowerList.push(lily);

    let tulip = new flower();
    tulip.name = "Tulip";
    tulip.price = 100;
    tulip.availableQuantity = 2300;
    lily.isChecked = false;

    this. myFlowerList.push(tulip);

    let carnation = new flower();
    carnation.name = "Carnation";
    carnation.price = 50;
    carnation.availableQuantity = 1500;
    lily.isChecked = false;

    this. myFlowerList.push(carnation);

    let gerbera = new flower();
    gerbera.name = "Gerbera";
    gerbera.price = 50;
    gerbera.availableQuantity = 1500;
    lily.isChecked = false;

    this. myFlowerList.push(gerbera);

    let orchid = new flower();
    orchid.name = "Orchid";
    orchid.price = 50;
    orchid.availableQuantity = 1500;
    lily.isChecked = false;

    this. myFlowerList.push(orchid);

  }

  trackFlowers(index,flower){
    return flower?flower.name:undefined
  }
}
  

Once you subscribe to the behavior subject whenever it value change it will execute the printSearchtext() method.

Here I have print it in landing.component.html file as below.

<div>Your search text is: {{searchText}}</div>

When user type new search term we must update behavior subject.

I added below code in app.component.ts file to do that. Here also you need to inject your service class.

Then call setSearchText() method to update new values.

Here is the code in app.component.html. I have added input event where it triggers whenever user types something on the text filed.


  <header>
  <div class="container">
    <a href="" class="logo">My flower shop</a>
  <span [style]="{'padding-left':'10px'}" >
    
      <input type="text" pInputText placeholder="Search" (input)="updateSearchText()" [(ngModel)]="searchText" />
  </span>
    <nav>
      <ul>
        <li><a href="" routerLink="/">Landing</a></li>
        <li><a href="" routerLink="/home">Home</a></li>
      </ul>
    </nav>
  </div>
</header>

<div class="container">
  <router-outlet></router-outlet>
</div>

In app.component.ts I have defined the updateSearchText() method and call data service to update behavior subject.

Import the data.service and inject it through constructor. This is called Dependency Injection in Angular. I will explain it in detail future.


import { Component, ViewEncapsulation } from '@angular/core';
import {InputTextModule} from 'primeng/inputtext';
import { DataService } from './services/data.service';

@Component({
  selector: 'app-root',
  templateUrl: './app.component.html',
  styleUrls: ['./app.component.scss'],
  encapsulation: ViewEncapsulation.None

})
export class AppComponent {
  title = 'my-flower-store';
  searchText:string='';

  constructor(private dataService:DataService){

  }

  updateSearchText(){
    this.dataService.setSearchText(this.searchText);
  }
}
  

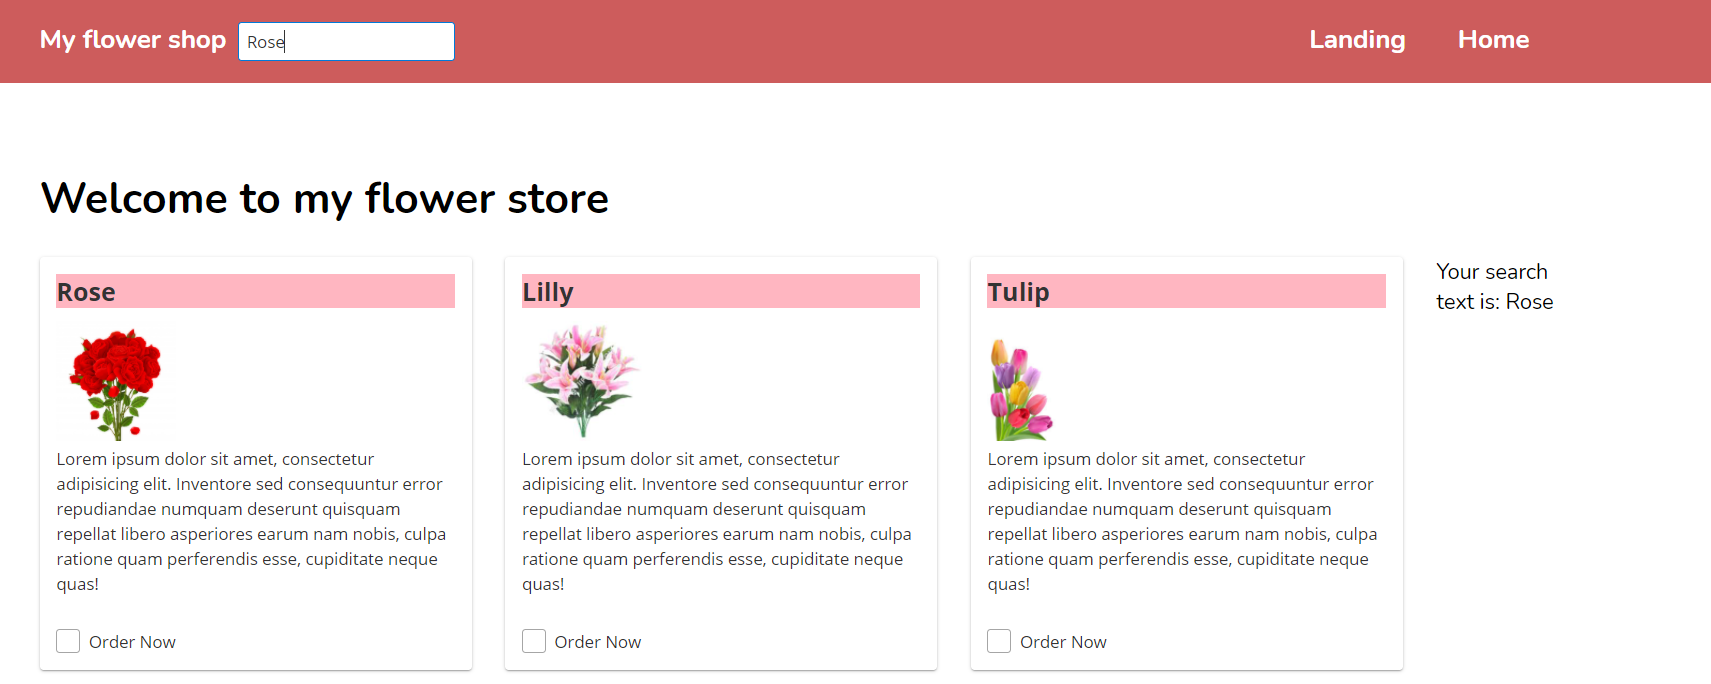
Now you can see the magic happens in your browser.

how you can share data between parent child components

Good Luck with learning concept of sharing data between unrelated components. Next chapter we will see how you can share data between parent child components.

LightBlog