
Related Articles

Identity Columns in DB2 AS/400

Does DB2 support for identity columns? Yes, it is. All numeric data types in DB2 database support for identify columns. Identity columns means, a field or column in a database table which automatically set its values for a new row insert. You don't need to provide value for the identity field when you insert new row into your table. For example if you want to set your customer identification number grow like 1000,1001,1002,1003... , you can set customer identification number column as identity column and starting number 1000 and increment value is 1. Then when you insert next customer it will increase the maximum customer identification number by 1 and automatically insert into the table.

You can find iSeries Navigator from "Start -> IBM iSeries Access for Windows -> iSeries Navigator". Open iSeries Navigator and select your database and table that you need insert identity column. Keep in mind that you can only set identity only for numeric fields. You can either create new table with identity columns or set identity property for existing table.
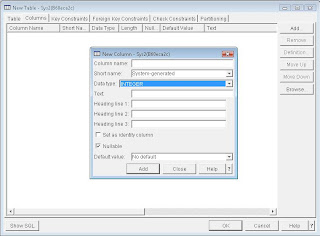
Fig 1: Insert New Column with Identity
In Table go to Column tab and click on Add button to add new column. Specify column name, short name, data type text...etc. If you select numeric data type for you column you will see a check box "Set as identity column". Tick that check box to enable identity for this column. Once you check the check box it will expand the window which allow you to configure the identity settings.
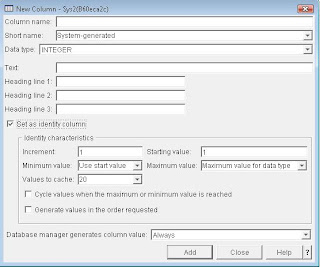
Fig 2: Set as Identity Column

Set Increment to an any value that you want increment your identity value. If you set 1 here it will increase the existing maximum number by 1. Starting value is used to set increase first row. Minimum value and Maximum value are used to restrict the values to a particular range. Values to cache is used to load last maximum values to memory so that increase the maximum value by Increment value is not needed a database hit for read maximum value for the identity column. "Cycle values when the maximum or minimum value is reached" check box is used to set whether the repetative value range is necessary when the datatype is reached its maximum or minimum values. This option is not allowed if you have set the column as primary or unique key for the table. "Generate the values in the order requested" check box is used to set whether you need to set values for the column in order or not. For example if you delete any value in between the value range whether that value is reusable or not.
Once you set any column as identity you don't need to give values when you insert a record into table. This column will automatically will be filled by the DBMS itself.

Comments

Popular posts from this blog

The Power of ChatGPT and Whisper Models

A Deep Dive into Natural Language Processing Natural Language Processing (NLP) has seen a significant boost in recent years due to advancements in artificial intelligence and machine learning. Two models that have shown remarkable success in NLP are ChatGPT and Whisper. In this article, we will delve into the power of these models and their applications in the field of NLP. ChatGPT is a transformer-based language model developed by OpenAI that uses unsupervised learning to predict the next word in a sentence based on the context of previous words. ChatGPT is a generative model that is trained on large datasets of text, such as books and articles, and can be fine-tuned for specific tasks, such as question-answering or dialogue generation. ChatGPT is known for its ability to produce human-like text, making it an ideal tool for applications such as chatbots, content creation, and language translation. Whisper, on the other hand, is a paraphrasing model developed by Google that is based on

Angular PrimeNG checkboxes styling and events handling

  Getting Started With PrimeNG Styling in Angular App This chapter I am planning to show how you can handle events of the checkboxes. For that I will use checkbox for every card to place the order.  To use PrimeNG checkboxes you have to import checkbox module in app.module.ts file. import {CheckboxModule} from 'primeng/checkbox'; import { BrowserModule } from '@angular/platform-browser'; import { NgModule } from '@angular/core'; import { AppRoutingModule } from './app-routing.module'; import { AppComponent } from './app.component'; import { LandingComponent } from './modules/landing/landing.component'; import { HomeComponent } from './modules/home/home.component'; import { CardModule } from 'primeng/card'; import {CheckboxModule} from 'primeng/checkbox'; @NgModule({ declarations: [ AppComponent, LandingComponent, HomeComponent ], imports: [ BrowserModule, AppRoutingModule, CardModu

Angular NgFor directive and trackby

Today we will learn about NgFor one of the core directive of angular. NgFor helps to build list and tables in Angular   Let us see the example in our flower store app. In the landing page I am going to print list of flowers that are available in the store. Later we will add images and show them in a carousel to rotate automatically. First we will create the domain class called flower.ts and you can copy paste below code.  export class flower{ constructor() { } name:string=''; price:number = 0; availableQuantity:number = 0 } To use this domain class inside another component you must specify export keyword along with the class keyword. Flower domain has 3 attributes to store name of the flower then price and the available quantity. Now we can create the array from the flower type as below inside the landing.component.ts file. myFlowerList:flower[]=[]; I will call a method inside ngOnInit to add values to the array as below. ngOnInit is one of t