Related Articles

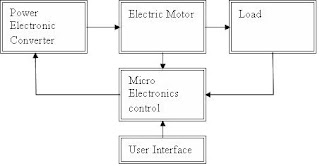
Structure of Drive System


Figure 1: Structure of drive system


Load is the most important component. All other units are arranged to serve the requirement of the load. Any design begins with a list of specifications for the load. This depends on the type of the load and its environment. We need to answer several questions before preparing specifications.


Eg:
  • Whether one, two or four quadrant operation is necessary
  • Whether servo or adjustable speed action is necessary
  • Whether breaking energy is to be dissipated or returned back to the utility
  • Whether a soft or hard start is suitable
  • What are the range of speed and the resolution of the speed control?
  • What are maximum torque?
  • Is there a space restriction?
  • Is there a noise level restriction?
  • Is there some starting current restriction?
  • Is there any EMI (Electro Magnetic Interference) restriction?
  • Is there supply end restrictions? (Eg: Total Harmonic Distrotion)?
  • Whether the energy efficiency is a prime consideration
and many more.

The components in the drive system are independent. The load to some extent can suggest the type of motor required. The motor selection it self is a challenging task that requires good understanding and skill about the performance of different motors. This difficulty arise due to the availability of a large count of competitive motor types. The power electronic converters is often specified by the motor selected. For DC motors we need one type of converter but for AC motors we need a different type converter. A stepper motor needs a totally different converter and so on.

Eg:

Figure 2: Table of Choices of power electronic converter

Additional stages may also be necessary on top of the basic converter circuit to accommodate such features as returning breaking energy back to the supply network etc. In all the power converters listed in the table DC was used as input source. This is not because the primary power available from the power system is DC but the common practice of a diode rectifiers unit to interface the power system (This is done to minimize the distortions at the supply end).

Figure 3: AC to DC Converter

Microelectronic control unit is central to all other components in the system and it co-ordinates the activities of all. It receives feedback from the load and motor and dictates terms to the power electronic converter according to the user input. The microelectronic control unit is a computer. It can be a micro-controller or is some cases a PLC. Discretely assembled microelectronic control units too are not common.
Comments

Popular posts from this blog

The Power of ChatGPT and Whisper Models

A Deep Dive into Natural Language Processing Natural Language Processing (NLP) has seen a significant boost in recent years due to advancements in artificial intelligence and machine learning. Two models that have shown remarkable success in NLP are ChatGPT and Whisper. In this article, we will delve into the power of these models and their applications in the field of NLP. ChatGPT is a transformer-based language model developed by OpenAI that uses unsupervised learning to predict the next word in a sentence based on the context of previous words. ChatGPT is a generative model that is trained on large datasets of text, such as books and articles, and can be fine-tuned for specific tasks, such as question-answering or dialogue generation. ChatGPT is known for its ability to produce human-like text, making it an ideal tool for applications such as chatbots, content creation, and language translation. Whisper, on the other hand, is a paraphrasing model developed by Google that is based on

Angular PrimeNG checkboxes styling and events handling

  Getting Started With PrimeNG Styling in Angular App This chapter I am planning to show how you can handle events of the checkboxes. For that I will use checkbox for every card to place the order.  To use PrimeNG checkboxes you have to import checkbox module in app.module.ts file. import {CheckboxModule} from 'primeng/checkbox'; import { BrowserModule } from '@angular/platform-browser'; import { NgModule } from '@angular/core'; import { AppRoutingModule } from './app-routing.module'; import { AppComponent } from './app.component'; import { LandingComponent } from './modules/landing/landing.component'; import { HomeComponent } from './modules/home/home.component'; import { CardModule } from 'primeng/card'; import {CheckboxModule} from 'primeng/checkbox'; @NgModule({ declarations: [ AppComponent, LandingComponent, HomeComponent ], imports: [ BrowserModule, AppRoutingModule, CardModu

Angular NgFor directive and trackby

Today we will learn about NgFor one of the core directive of angular. NgFor helps to build list and tables in Angular   Let us see the example in our flower store app. In the landing page I am going to print list of flowers that are available in the store. Later we will add images and show them in a carousel to rotate automatically. First we will create the domain class called flower.ts and you can copy paste below code.  export class flower{ constructor() { } name:string=''; price:number = 0; availableQuantity:number = 0 } To use this domain class inside another component you must specify export keyword along with the class keyword. Flower domain has 3 attributes to store name of the flower then price and the available quantity. Now we can create the array from the flower type as below inside the landing.component.ts file. myFlowerList:flower[]=[]; I will call a method inside ngOnInit to add values to the array as below. ngOnInit is one of t