
Related Articles

SMPP protocol library for fast and easy SMSC(Short Message Service Centre) client development even for non-telecom guys

SMS sending through .NET C# is really easy. But most of the guys face many issues with SMSC client developments. SMPP protocol has many parameters to configure, but for simple SMPP gateway application you need very few of them to configure correctly. This article will cover how to implement SMSC client application using EasySMPP library. EasySMPP is a free SMPP library used by many people to implement SMS sending applications. There are many SMPP libraries but EasySMPP library is very easy to use and relatively stable.

EasySMPP library mainly contain five class library projects.


KernelParameters, SMPPClient, SMSClient, SMSService and Tools are the library projects and you only need to use SMSClient library to implement SMPP client application. First download EasySMPP library and add class library project to your .NET C# solution. 

1. public bool SendSms(string from, string to, string text)

SendSms(string from, string to, string text) is the method to use your SMS details. You need to specify sending mobile number, destination mobile number and message body. Maximum single message can have 160 characters and if your message is much bigger than 160 characters, you need to send as multiple messages, simply calling SendSms() method repeatedly. 

1. SmsClient client = new SmsClient();
2. client.Connect();
3.
4. System.Threading.Thread.Sleep(1000);
5.
6. if (client.SendSms(from.ToString().Trim(), mobileNumber.ToString().Trim(), messageBody.ToString().Trim()))
7.      //Message Sent
8. else
9.      //Error
10.
11. client.Disconnect();

Line 1 create SMSClient object and need to call Connect() method to establish the connection between SMPP client app and SMSC server. Line 4 have to wait some time (1000 ms) if your SMPP client and SMSC server connection is slow. If you don't wait, it might give "Binding Error" and return errorCode 0.

Then call SendSms() method and pass from, to, and message details. If you want to hide or wrap your sending mobile number, you can use "Number Mask" as from parameter. Then receiver won't see your sending mobile number instead see common number or some name. Number Mask can be 11 characters maximum with most of the service providers. Based on the return values of client.SendSms() method you can proceed or handle error.

Finally you need to disconnect the connection as Line 11. This step is really important otherwise you will get binding errors.

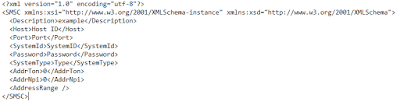
Final step is configure smsc.cfg file, which has all connection parameters with SMSC server with service provider. 


You need to configure Host IP address, SMSC Port, System ID, System Password, System Type, AddrTon and AddrNpi values. These parameters your have to get from your mobile service provider.

Comments

Popular posts from this blog

The Power of ChatGPT and Whisper Models

A Deep Dive into Natural Language Processing Natural Language Processing (NLP) has seen a significant boost in recent years due to advancements in artificial intelligence and machine learning. Two models that have shown remarkable success in NLP are ChatGPT and Whisper. In this article, we will delve into the power of these models and their applications in the field of NLP. ChatGPT is a transformer-based language model developed by OpenAI that uses unsupervised learning to predict the next word in a sentence based on the context of previous words. ChatGPT is a generative model that is trained on large datasets of text, such as books and articles, and can be fine-tuned for specific tasks, such as question-answering or dialogue generation. ChatGPT is known for its ability to produce human-like text, making it an ideal tool for applications such as chatbots, content creation, and language translation. Whisper, on the other hand, is a paraphrasing model developed by Google that is based on

Angular PrimeNG checkboxes styling and events handling

  Getting Started With PrimeNG Styling in Angular App This chapter I am planning to show how you can handle events of the checkboxes. For that I will use checkbox for every card to place the order.  To use PrimeNG checkboxes you have to import checkbox module in app.module.ts file. import {CheckboxModule} from 'primeng/checkbox'; import { BrowserModule } from '@angular/platform-browser'; import { NgModule } from '@angular/core'; import { AppRoutingModule } from './app-routing.module'; import { AppComponent } from './app.component'; import { LandingComponent } from './modules/landing/landing.component'; import { HomeComponent } from './modules/home/home.component'; import { CardModule } from 'primeng/card'; import {CheckboxModule} from 'primeng/checkbox'; @NgModule({ declarations: [ AppComponent, LandingComponent, HomeComponent ], imports: [ BrowserModule, AppRoutingModule, CardModu

Angular NgFor directive and trackby

Today we will learn about NgFor one of the core directive of angular. NgFor helps to build list and tables in Angular   Let us see the example in our flower store app. In the landing page I am going to print list of flowers that are available in the store. Later we will add images and show them in a carousel to rotate automatically. First we will create the domain class called flower.ts and you can copy paste below code.  export class flower{ constructor() { } name:string=''; price:number = 0; availableQuantity:number = 0 } To use this domain class inside another component you must specify export keyword along with the class keyword. Flower domain has 3 attributes to store name of the flower then price and the available quantity. Now we can create the array from the flower type as below inside the landing.component.ts file. myFlowerList:flower[]=[]; I will call a method inside ngOnInit to add values to the array as below. ngOnInit is one of t